E2. Ruotare un’immagine in un PictureBox - Image.RotateFlip
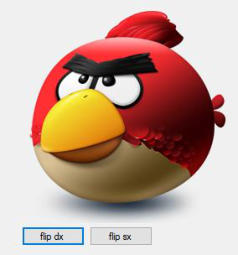
L’immagine può essere scaricata qui: angrybird e caricata in C:\Temp\
B1. Create a new folder

Grafica - Graphics

Folders
Backup
è
un’efficiente
applicazione
per
il
salvataggio
di
cartelle
o
intere
partizioni.
Offre
quanto
serve
per
garantire
una
corretta
gestione
dei
backup
con
una
notevole
semplicità
d’uso
e
un’interfaccia
che
permette
un’impostazione
alla
portata
dei
meno
esperti
e
che
fornisce
subito
tutte
le
informazioni
necessarie
per
avere
una
chiara visione dello stato dei propri backups.
Folders
Backup
is
an
efficient
application
for saving folders or entire partitions.
It
offers
what
you
need
to
ensure
proper
backup
management
with
a
remarkable
ease
of
use
and
an
interface
that
allows
a
setting
within
the
reach
of
the
less
experienced
and
that
immediately
provides
all
the
information
you
need
to
have
a
clear
view of the status of your backups.


Invia Email
S
end Email
1.
Copiare il contenuto di un PictureBox in un altro PictureBox
2.
Ruotare e salvare un’immagine in un PictureBox con Image.RotateFlip
3.
Ruotare un’immagine con step di un grado
4.
Salvare un Form come immagine
5.
Screenshot di una porzione rettangolare dello schermo
6.
Convertire un’immagine in greyscale
7.
Far seguire un’immagine al cursore con effetto “elastico” (Trackball)
1.
Copy the contents of one PictureBox to another
2.
Rotate and save an image in a PictureBox with Image.RotateFlip
3.
Rotate an image in one degree steps
4.
Save a Form as an image
5.
Screenshot of a rectangular portion of the screen
6.
Convert an image to greyscale
7.
Follow a cursor image with "elastic" effect (Trackball)
Alcuni esempi di metodi per copiare l’immagine di un PictureBox in un altro PB
Aggiungere al Form 6 Button. Due PictureBox sono aggiunti da programma. Senza modifiche al codice
l’immagine può essere scaricata qui: PicA.png e caricata in C:\Temp\.
Altrimenti utilizzare un’immagine 150x240 e modificare il percorso.

Public Class Form1
Dim PictureBox1 As New PictureBox()
Dim PictureBox2 As New PictureBox()
Private Sub Form1_Load(sender As Object, e As EventArgs) Handles MyBase.Load
Controls.Add(PictureBox1)
Controls.Add(PictureBox2)
PictureBox1.Size = New Size(150, 150)
PictureBox2.Size = New Size(150, 250)
PictureBox1.Top = 10
PictureBox1.Left = 10
PictureBox2.Top = 10
PictureBox2.Left = 170
PictureBox1.Image = Image.FromFile("C:\Temp\PicA.png")
End Sub
Private Sub Button1_Click(sender As Object, e As EventArgs) Handles Button1.Click
PictureBox2.Image = PictureBox1.Image.Clone 'l'immagine viene duplicata
End Sub
Private Sub Button2_Click(sender As Object, e As EventArgs) Handles Button2.Click
PictureBox2.Image = PictureBox1.Image 'l'immagini del PB2 mantiene le stesse referenze del PB1
End Sub
'Modificando i valori di area si può copiare una specifica porzione dell'immagine originale.
'By changing the area values you can copy a specific portion of the original image.
Private Sub Button3_Click(sender As Object, e As EventArgs) Handles Button3.Click
Dim sorg As New Bitmap(PictureBox1.Image)
'Dim area As New Rectangle(0, 0, PictureBox2.Width, PictureBox2.Height)
Dim area As New Rectangle(0, 0, 100, 100) 'Porzione diimmagine
Dim cloneImage As Bitmap = sorg.Clone(area, Imaging.PixelFormat.DontCare)
PictureBox2.Image = cloneImage
End Sub
'Copia solo la parte visibile del PictureBox1 - Copy only the visible part of the PictureBox1
Private Sub Button4_Click(sender As Object, e As EventArgs) Handles Button4.Click
Dim Sorg As New Bitmap(PictureBox1.Image)
Dim Dest As New Bitmap(PictureBox2.Width, PictureBox2.Height)
Dim immagine As Graphics = Graphics.FromImage(Dest)
'Modificando i valori di areaRet si può copiare una specifica porzione dell'immagine contenuta in PB1.
Dim areaRet As New Rectangle(0, 0, PictureBox1.Width, PictureBox1.Height)
Dim destRet As New Rectangle(0, 0, PictureBox1.Width, PictureBox1.Height)
'In alternativa per opiare l'immagine con effetto Stretch:
'Dim destRet As New Rectangle(0, 0, PictureBox2.Width, PictureBox2.Height)
' disegna l'area selezionata nella bitmap destinazione
immagine.DrawImage(Sorg, destRet, areaRet, GraphicsUnit.Pixel)
' e la inserisce nel PB2
PictureBox2.Image = Dest
End Sub
'Salva l’immagine di PB2
Private Sub Button5_Click(sender As Object, e As EventArgs) Handles Button5.Click
PictureBox2.Image.Save("C:\Temp\PicB.png", System.Drawing.Imaging.ImageFormat.Png)
End Sub
' Cancella l’immagine da PB2
Private Sub Button6_Click(sender As Object, e As EventArgs) Handles Button6.Click
PictureBox2.Image = Nothing
End Sub
End Class
Some examples of methods to copy
the image of a PictureBox in another PB
Add to Form 6 Button. Two PictureBoxes
are added programmatically.
Without code changes the image can be
downloaded here:
PicA.png
and uploaded to C:\Temp\.
Otherwise use a 150x240 image
and change the route.
E1. Copiare il contenuto di un PictureBox in un altro PictureBox
Dim PictureBox1 As New PictureBox()
Dim flipA As String = RotateFlipType.Rotate90FlipNone
Dim flipB As String = RotateFlipType.Rotate270FlipNone
Private Sub Form1_Load(sender As Object, e As EventArgs) Handles MyBase.Load
Controls.Add(PictureBox1)
PictureBox1.Size = New Size(250, 250)
PictureBox1.Top = 10
PictureBox1.Left = 20
PictureBox1.Image = Image.FromFile("C:\Temp\angrybird.png")
PictureBox1.SizeMode = PictureBoxSizeMode.AutoSize
End Sub
Private Sub Button1_Click(sender As Object, e As EventArgs) Handles Button1.Click
'PictureBox1.Image.RotateFlip(RotateFlipType.Rotate90FlipNone)
PictureBox1.Image.RotateFlip(flipA)
PictureBox1.Refresh()
End Sub
Private Sub Button2_Click(sender As Object, e As EventArgs) Handles Button2.Click
PictureBox1.Image.RotateFlip(flipB)
PictureBox1.Refresh()
End Sub


E2. Rotate an image in a
PictureBox - Image.RotateFlip
The image can be downloaded here:
angrybird and uploaded in C:\Temp\
E3. Ruotare un’immagine con step di un grado
Una singolare soluzione per ruotare un’immagine con step di un grado.
(Fonte: codes-sources.com)
L’immagine può essere scaricata qui: angrybird e caricata in C:\Temp\
Dim PictureBox1 As New PictureBox()
Private Sub Form1_Load(sender As Object, e As EventArgs) Handles MyBase.Load
Controls.Add(PictureBox1)
PictureBox1.Size = New Size(300, 300)
PictureBox1.Top = 20
PictureBox1.Left = 50
PictureBox1.Image = Image.FromFile("C:\Temp\angrybird.png")
PictureBox1.SizeMode = PictureBoxSizeMode.Normal
End Sub
Private Sub NumericUpDown1_ValueChanged(sender As Object, e As EventArgs) Handles
NumericUpDown1.ValueChanged
Rotation(NumericUpDown1.Value)
End Sub
Function Rotation(ByVal AngleDegre As Integer)
Dim G As Graphics
Dim Largh As Integer = PictureBox1.Image.Width
Dim Altez As Integer = PictureBox1.Image.Height
Dim IMG = PictureBox1.Image
G = PictureBox1.CreateGraphics()
G.Clear(Me.BackColor)
'on transforme l'angle en radians
Dim Angle As Double = AngleDegre / 180 * Math.PI
'Calcola le nuove coordinate
Dim PosX As Single = Math.Sqrt(2) * (Largh) * Math.Sin(Angle / 2) * Math.Cos(Math.PI / 4 + Angle / 2)
Dim PosY As Single = -Math.Sqrt(2) * (Altez) * Math.Sin(Angle / 2) * Math.Cos(Math.PI / 4 - Angle / 2)
'Esegue la rotazione
G.RotateTransform(AngleDegre)
'Disegna l'immagine alle nuove coordinate
G.DrawImage(IMG, PosX, PosY, Largh, Altez)
End Function

E3. Rotate an image in one
degree steps
A nice solution to rotate an image in one
degree steps.
(Source: codes-sources.com)
The image can be downloaded here:
angrybird and uploaded in C:\Temp\
E4. Screenshoot del Form
Salvare un Form come immagine
E4. Form Screenshoot
Saving a Form as Image
Imports System.Drawing.Imaging
Public Class Form1
Private Sub Button1_Click(sender As Object, e As EventArgs) Handles Button1.Click
'Corregge le dimensioni togliendo i bordi del form
Dim bmpScreenshot As Bitmap = New Bitmap(Width - 16, Height - 8, PixelFormat.Format32bppArgb)
' Crea un oggetto grafico
Dim gfxScreenshot As Graphics = Graphics.FromImage(bmpScreenshot)
' Esegue lo screenshot del form
gfxScreenshot.CopyFromScreen(Location.X + 8, Location.Y, 0, 0, Size, CopyPixelOperation.SourceCopy)
' e lo salva
bmpScreenshot.Save("C:\Temp\FormShoot2.jpg", ImageFormat.Jpeg)
End Sub
End Class
E5. Screenshot di una porzione rettangolare dello schermo
Questa mini applicazione ,che contiene alcune soluzioni interessanti, consente di catturare l’immagine
contenuta in un rettangolo disegnato con un Form e posizionabile a coprire qualsiasi parte dello schermo.
Si presta ad essere elaborato per ottenere più prestazioni.
Richiede un Form con tre Button e un secondo Form con un Timer
E5. Screenshot of a
rectangular portion of the
screen
This mini application, which contains
some interesting solutions, allows you
to capture the image contained in a
rectangle drawn with a Form and
positioned to cover any part of the
screen. It lends itself to be processed
for more performance.
Requires a Form with three Buttons and
a second Form with a Timer
Imports System.Drawing.Imaging
Imports System.IO
Public Class Form1
Sub New()
Me.StartPosition = FormStartPosition.CenterScreen
Me.Width = 300
Me.Height = 300
Me.FormBorderStyle = FormBorderStyle.None
InitializeComponent()
End Sub
Dim memoryImage As Bitmap
Private Sub Form1_Load(sender As Object, e As EventArgs) Handles MyBase.Load
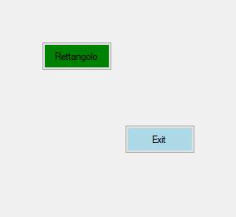
Button1.Text = "Cattura"
Button2.Text = "Rettangolo"
Button3.Text = "Exit"
Button1.Size = New Size(85, 35)
Button2.Size = New Size(85, 35)
Button3.Size = New Size(85, 35)
Button1.Location = New Point(50, 50)
Button2.Location = New Point(50, 50)
Button3.Location = New Point(150, 150)
Button1.BackColor = Color.OrangeRed
Button2.BackColor = Color.Green
Button3.BackColor = Color.LightBlue
If Directory.Exists("C:\Temp") = False Then 'Usata per memorizzare l'immagine
Directory.CreateDirectory("c:\Temp") 'Used to store the image
End If
End Sub
'Cattura la parte dello schermo selezionata con Form2
'Captures the part of the screen selected with Form2
Private Sub CatturaScreen() 'Rettangolo
Form2.Hide()
Dim myGraphics As Graphics = Form2.CreateGraphics()
Dim area As Size = Form2.Size
'Memorizza l'immagine escludendo i bordi del Form2
'Stores the image by excluding the edges of Form2
memoryImage = New Bitmap(area.Width - 16, area.Height - 8, myGraphics)
Dim memoryGraphics As Graphics = Graphics.FromImage(memoryImage)
memoryGraphics.CopyFromScreen(Form2.Location.X + 8, Form2.Location.Y, 0, 0, area)
memoryImage.Save("C:\Temp\ImmaginProva2" & ".bmp", ImageFormat.Bmp)
Form2.Visible = True
End Sub
Private Sub Button1_Click(sender As Object, e As EventArgs) Handles Button1.Click
CatturaScreen()
Form2.Close()
'Ripristina le dimensioni di Form1
'Restore Form1 size
Me.Width = 300
Me.Height = 300
Button1.Location = New Point(50, 50)
Button2.Visible = True
MsgBox("Cattura salvata in C:\Temp\")
End Sub
Private Sub Button2_Click(sender As Object, e As EventArgs) Handles Button2.Click
Form2.StartPosition = FormStartPosition.CenterScreen
Form2.Show()
Form2.Timer1.Start()
Button2.Visible = False
Button1.Visible = True
Button1.Location = New Point(0, 0)
'Imposta la dimensione dell'area Form1 contenente il tasto Cattura
'Sets the size of the Form1 area containing the Capture key
Me.Width = 85
Me.Height = 35
End Sub
Private Sub Button3_Click(sender As Object, e As EventArgs) Handles Button3.Click
Application.Exit()
End Sub
End Class
Public Class Form2
Private Sub Form2_Load(sender As Object, e As EventArgs) Handles MyBase.Load
Me.BackColor = Color.Pink
Me.Opacity = 0.5
ControlBox = False
Text = ""
End Sub
Private Sub Timer1_Tick(sender As Object, e As EventArgs) Handles Timer1.Tick
Dim ValueX, ValueY As Integer
ValueX = Me.Location.X
ValueY = Me.Location.Y
If ValueY > 70 Then
Form1.Location = New Point(ValueX + 8, ValueY - 40) 'Move the Capture Button with Form2
Else
Form1.Location = New Point(ValueX + 8, ValueY + Height) 'Move the Capture button under Form2
End If
End Sub
End Class